
"John has been so helpful. If you have any issues at all, he will graciously walk you through each step, and he responds very quickly. This is a great gift for a plane fanatic — my husband loves it! (And I do too!)"
Introducing the Mach 2
Every Flight.
Overhead.
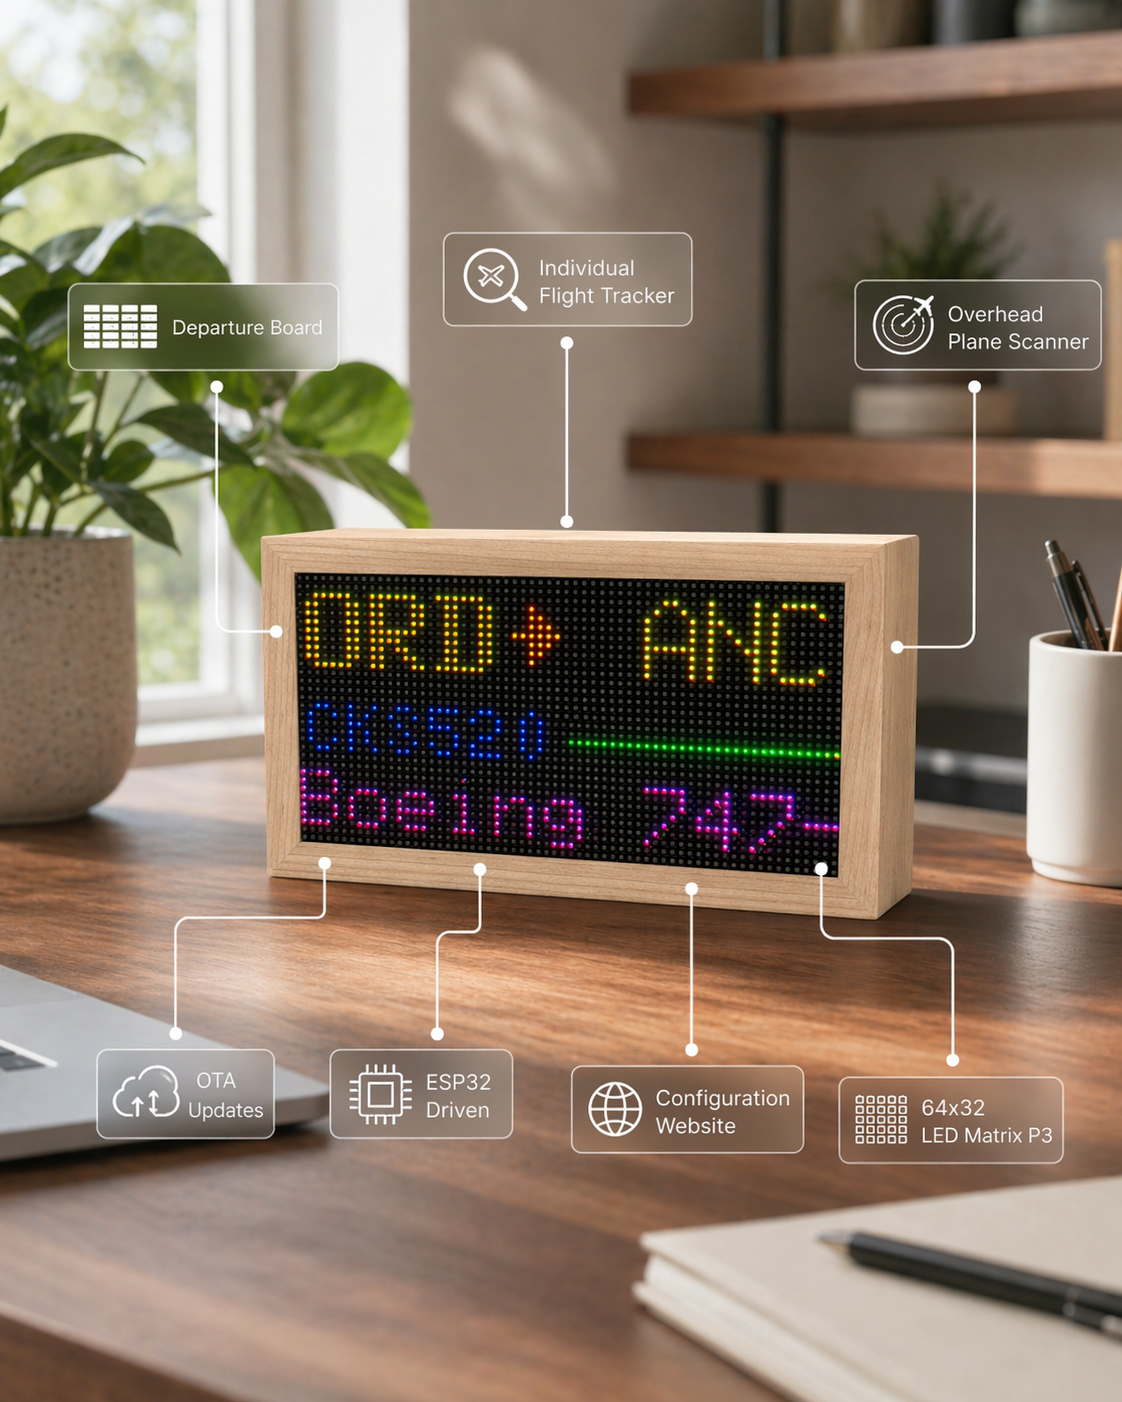
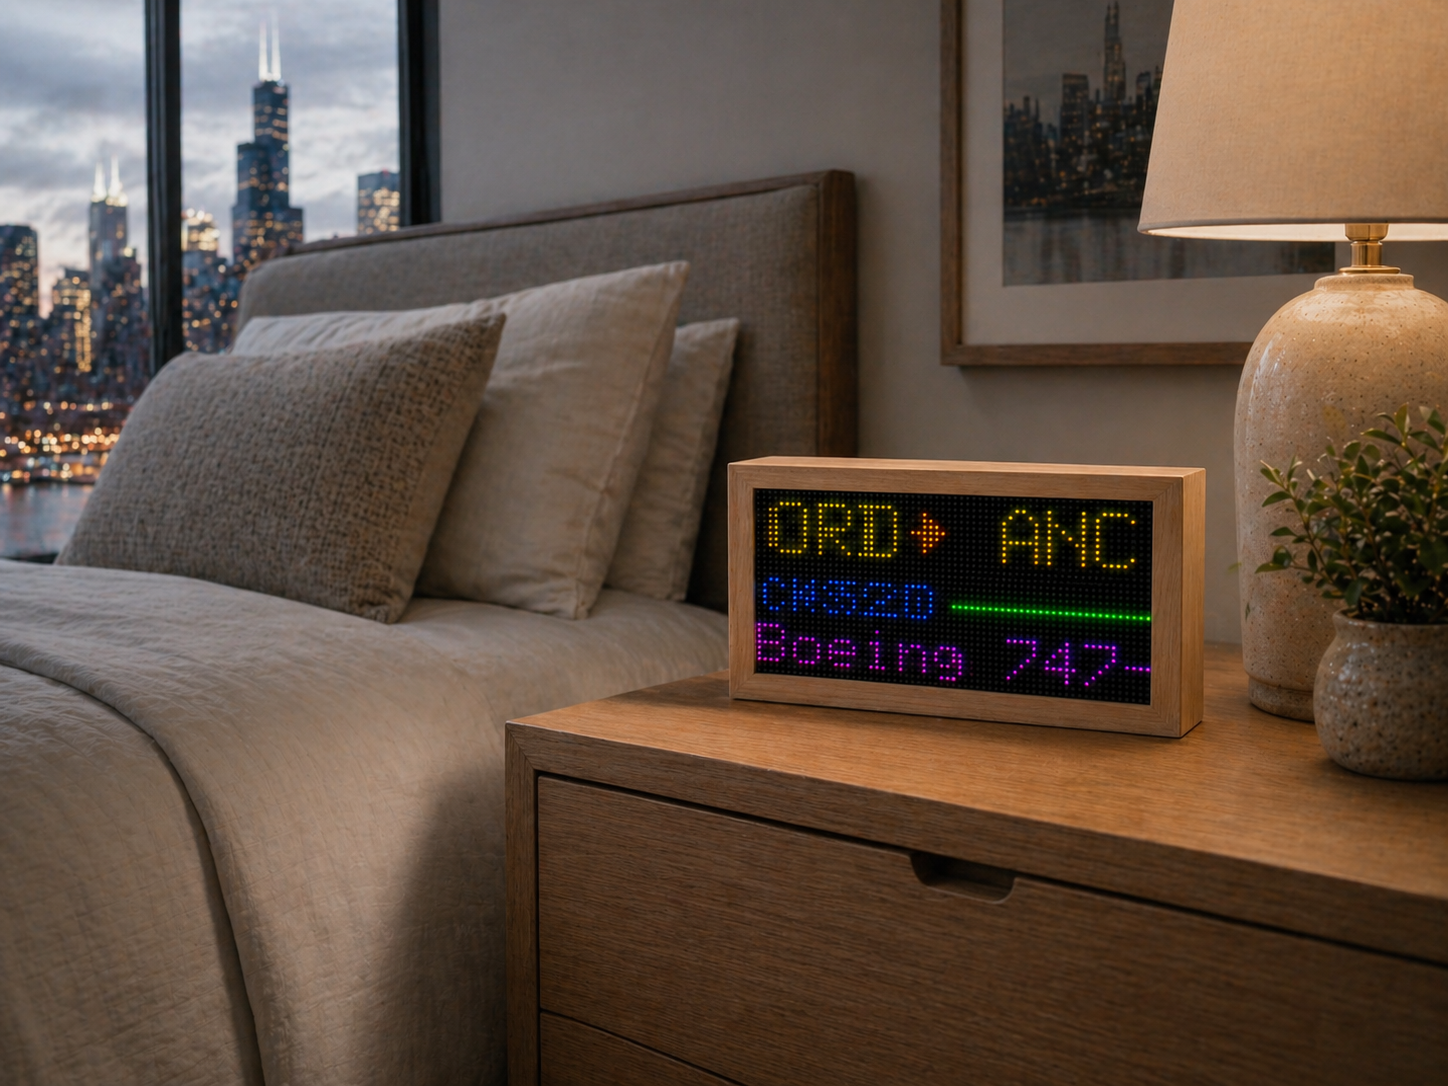
A handmade LED flight tracker display. Every plane overhead, every flight number — live ADS-B data on a 2,048-pixel matrix, wrapped in solid maple. No app, no subscription.
Display
2,048-pixel LED Matrix
Full color, always crisp
Processor
ESP32-S3
Fast boot, low power
Data
Live ADS-B
Real-time, no delays
Frame
Solid Maple
Hand-assembled
$449.99
Free worldwide shipping
Live Overhead Tracking
See nearby aircraft as they enter your configured tracking area.
Track Any Flight
Enter a flight number and follow route, altitude, speed, and status.
Browser Setup, No App
Connect over USB, join Wi-Fi, then configure from any browser.
Modes That Keep Growing
Scenes, filters, brightness control, and free OTA improvements.
The Hardware
Mach 2.
Built on ESP32-S3 with a full-color 2,048-pixel LED matrix. Pulls live ADS-B data for the Overhead Scanner, follows specific flight numbers, and supports multiple display modes, scenes, brightness settings, and filters — no app required. See how the Mach 2 compares to The Flight Wall →
$449.99
USD · Free worldwide shipping
Customer Reviews
Trusted by real customers.
A few verified customer favorites are shown here — more live on the Mach 2 product page.
"Absolutely made my husband's Christmas. It is extremely hard to buy for someone who has everything, and this exceeded expectations! Thank you for this amazing little box of fun!"
"I sincerely love this item! I had a bit of trouble connecting, as my PC was six years old, and my Mac didn't want to cooperate. But John patiently helped me throughout the process. Truly outstanding customer service! The quality is first-rate, and it's a terrific addition to all my aviation gadgetry. Can't recommend this enough--worth every penny!"
From Unboxing to Tracking
Up and running in under 5 minutes.
Plug In & Connect
Power via USB-C. Open the browser-based setup page — no app download. Connect to Wi-Fi in seconds.
Define Your Sky
Search an address, use a preset radius, or draw a custom tracking area. The display scans automatically.
Choose a Mode
Watch overhead traffic, lock onto a specific flight, open Departure Board, or switch into scenes and other display apps.
Tune the Display
Adjust brightness, distance, altitude, aircraft filters, and display preferences from the dashboard.
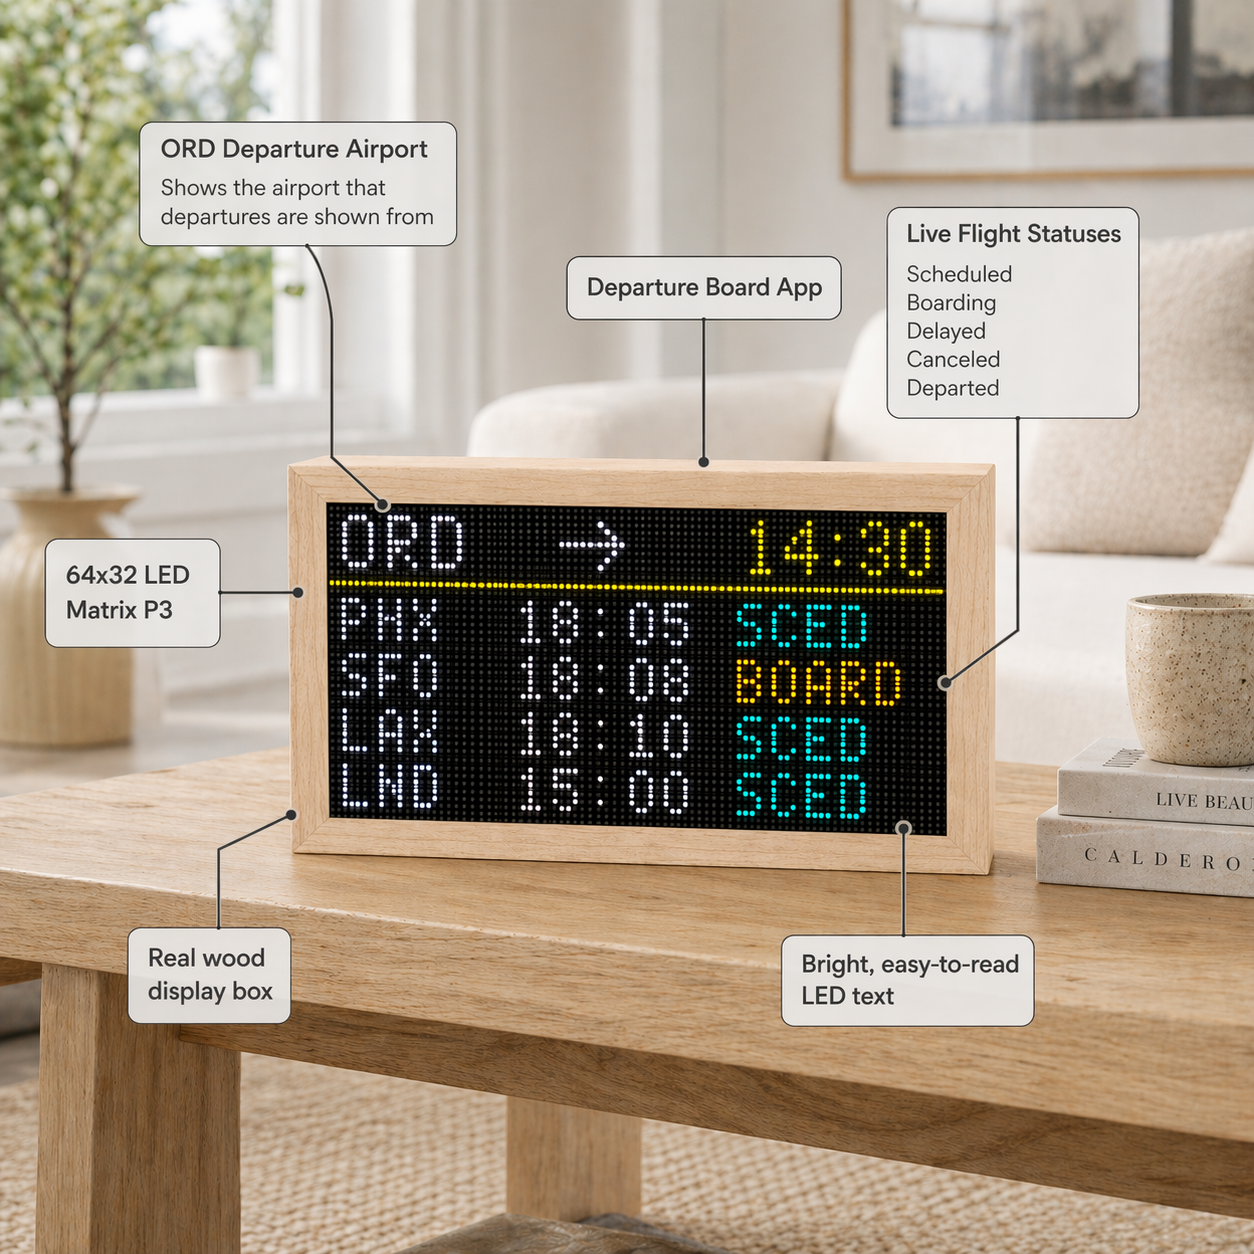
New Feature
Departure
Board Mode.
Turn your tracker into a personal airport FIDS — showing live departures from any airport, right on your desk. Specific flight tracking and Departure Board mode use a low-cost FlightAware AeroAPI key that you add in the dashboard. If you do not want to create one, reach out and I will help make it work.
✈ Available on Mach 2
Legacy Update
Original Flight Tracker boxes.
A short note on why some first-generation FlightTrackerLED boxes stopped updating, what changed, and the two ways I can help.
What happened
The original setup became too expensive to keep running the same way.
The first Flight Tracker boxes were Raspberry Pi based and used an earlier API path. Over time, the amount of API traffic those boxes generated became too expensive for me to keep paying for in the background.
The original data setup worked for a long time, but the cost and request volume kept growing. I had to move the platform to something more sustainable so I could keep supporting the boxes without the API bill getting out of hand.
Mach 2 now uses Airplanes.live as the main overhead data source, and the newer firmware is built around redundancy: documented data-source options, configurable providers, and a provider toggle in settings so the user can switch data sources if one API changes, gets expensive, or goes away.
I also have guides for open aviation APIs and alternate data sources, so owners are not locked into one backend forever. If a provider stops making sense, a new one can be switched on from settings without replacing the box.
Redundancy
The focus now is simple: no single data provider should be the whole product. If one API becomes too expensive or stops working, the box has another documented path, and OTA updates give me another way to keep it supported.
Documentation
Setup Guide
Get your Mach 2 connected and tracking flights in a few minutes. All you need is the included USB-C cable and a computer running Chrome or Edge.
01
Step 1 — Connect via USB
Flight Tracker Mach 2 uses USB Web Serial for setup — no app downloads, accounts, or Bluetooth pairing needed. When the display first powers on, it cycles through setup instructions on the LED matrix.
- Plug in your Flight Tracker to your computer using the included USB-C cable.
- Open Chrome or Edge on your computer and go to setup.flighttrackerled.com.
- Click "Connect Device" — your browser prompts you to select a USB serial device. Choose your Flight Tracker.
⚠ Web Serial requires a desktop browser — Chrome or Edge on macOS, Windows, or Linux. It does not work on phones or tablets. If the device does not appear, try a different USB-C cable or port.
02
Step 2 — Connect to Wi-Fi
- Click "Scan Networks" to see nearby Wi-Fi networks.
- Select your home network from the list, or type the SSID manually.
- Enter your Wi-Fi password and click "Save and Connect."
The display will restart and connect. Once online, the LED matrix confirms the connection. You can unplug the USB cable from your computer — the tracker runs on its own from any standard 5V USB-C power source.
✓ Wrong password? The display returns to setup mode. Reconnect via USB and try again.
03
Step 3 — Set Your Location
Open the built-in settings dashboard at the tracker's IP address, shown on the LED matrix at startup. You can use any device on the same Wi-Fi network for this step, including a phone or tablet.
Option A — Search by Address
- Type your address, city, or ZIP code into the location field.
- Click Search — the dashboard sets your coordinates and creates a 20-mile tracking area.
- Click Save.
Option B — Custom Area
- Go to bboxfinder.com and draw a rectangle around your area.
- Copy the URL and paste it into the Custom Boundary field on the dashboard.
- Or use the dashboard presets for a quick 20-mile or 40-mile tracking radius.
04
Step 4 — Add FlightAware for Advanced Modes
Specific flight tracking and Departure Board mode need a FlightAware AeroAPI key. It is usually inexpensive for normal personal use, and it lets Mach 2 request live flight status and airport board data. Keep it private, just like a password.
- Go to flightaware.com/aeroapi/signup/personal.
- Create or sign in to your FlightAware account.
- Choose the Personal AeroAPI tier if you are using the display for personal or academic use.
- Review FlightAware's current pricing and included monthly credit before enabling it.
- Copy your AeroAPI key from the FlightAware portal and paste it into the Mach 2 dashboard.
✓ Overhead Scanner does not need this key. It is for specific flight and airport-board features that use FlightAware data. If you cannot or do not want to create a key, email or text me and I will help you get it working.
05
Step 5 — Choose a Tracking Mode
Specific Flight Tracking
- Open the display mode selector and choose Specific Flight or Track Flight.
- Enter an airline code plus flight number, such as UA970, AA100, or DAL123.
- Click Save or Apply. The display looks up the flight and shows live route, timing, position, altitude, and speed when available.
Departure Board
- Choose Departure Board from the dashboard.
- Enter the airport code you want to watch, such as ORD, LAX, or JFK.
- Set departures, result count, and refresh frequency if those controls are available.
✓ A 10-15 minute departure-board refresh is a good starting point. Slower refreshes reduce FlightAware API usage.
06
Step 6 — Customize Your Display
- Adjust brightness — Dial it to match your room.
- Switch display modes — Move between Overhead Scanner, specific flight tracking, Departure Board, clock, scenes, and other apps.
- Set flight filters — Filter by altitude, distance, or aircraft type.
- Update choices anytime — Change tracked flight numbers, airports, tracking areas, and preferences from the dashboard.
Your Mach 2 receives free OTA updates automatically — new features ship straight to your display over Wi-Fi.
!
Troubleshooting
- Device not showing up? Use Chrome or Edge on desktop. Try a different cable or USB port.
- "Firmware did not answer"? Unplug, wait a few seconds, replug, click Connect again.
- No flights showing? Try the 40-mile preset or draw a larger area on bboxfinder.com.
- Specific flight not found? Confirm the flight is active today and use the airline code plus flight number exactly as shown on FlightAware.
- Departure Board is blank? Check the airport code, AeroAPI key, result count, and refresh interval.
- Worried about API usage? Increase the refresh interval, reduce displayed flights, and check FlightAware's My AeroAPI usage page.
- Can't access dashboard? Make sure your device is on the same Wi-Fi as the tracker.
- Need to start over? Use Clear WiFi on the setup page to reset network settings.
- Still stuck? Contact us — we respond quickly.
Scene Guide
Overhead Scanner
Mach 2's overhead flight tracker. Set your home location, define the sky you care about, and watch planes overhead appear as live snapshots arrive.
Main App
A live window into the traffic above you.
Overhead Scanner is how Mach 2 tracks flights overhead in real time. It uses your saved tracking area, altitude filters, and display preferences to show the planes overhead on the LED matrix — the box publishes your settings, the cloud builds a fresh flight snapshot, and Mach 2 renders the current aircraft list locally.
How it works
Boundary in, snapshot out.
Your dashboard stores a home point, a tracking boundary, airport code, brightness, and filters. When settings are saved, the box republishes them and waits for the next cloud snapshot.
How to use it
Start with your address.
Use the location search for a simple 20-mile area, pick the 40-mile preset for more traffic, or paste a bboxfinder.com boundary if you want precise control.
What you can tune
Make the display match your sky.
Adjust brightness, altitude range, distance, aircraft detail fields, and other display preferences from the local settings dashboard.
Why people love it
An overhead flight tracker for your sky.
Instead of opening an app to track flights overhead, you glance at a desk display and see exactly what is flying over your home — a standing overhead flight tracker that quietly updates all day.
Workflow
Using Overhead Scanner
- Open the dashboard. Use the IP address shown on the matrix after the box joins Wi-Fi.
- Set your location. Search your address or paste a custom boundary from bboxfinder.com.
- Choose filters. Narrow by altitude, distance, and the details you want shown.
- Save settings. The box republishes your settings and the display updates when the next snapshot arrives.
Dashboard Settings
→
Cloud Flight Snapshot
→
Mach 2 Matrix
Troubleshooting
If flights do not show right away
Give it a moment after saving. The box has to publish settings, receive a fresh snapshot, and apply it to the display.
Expand the area. If traffic is light, try the 40-mile preset or a larger custom boundary.
Check filters. A narrow altitude range or distance limit can hide flights that are otherwise available.
Check Wi-Fi and sync. If the dashboard says the box is waiting for a snapshot, leave it connected and refresh status after a few seconds.
Scene Guide
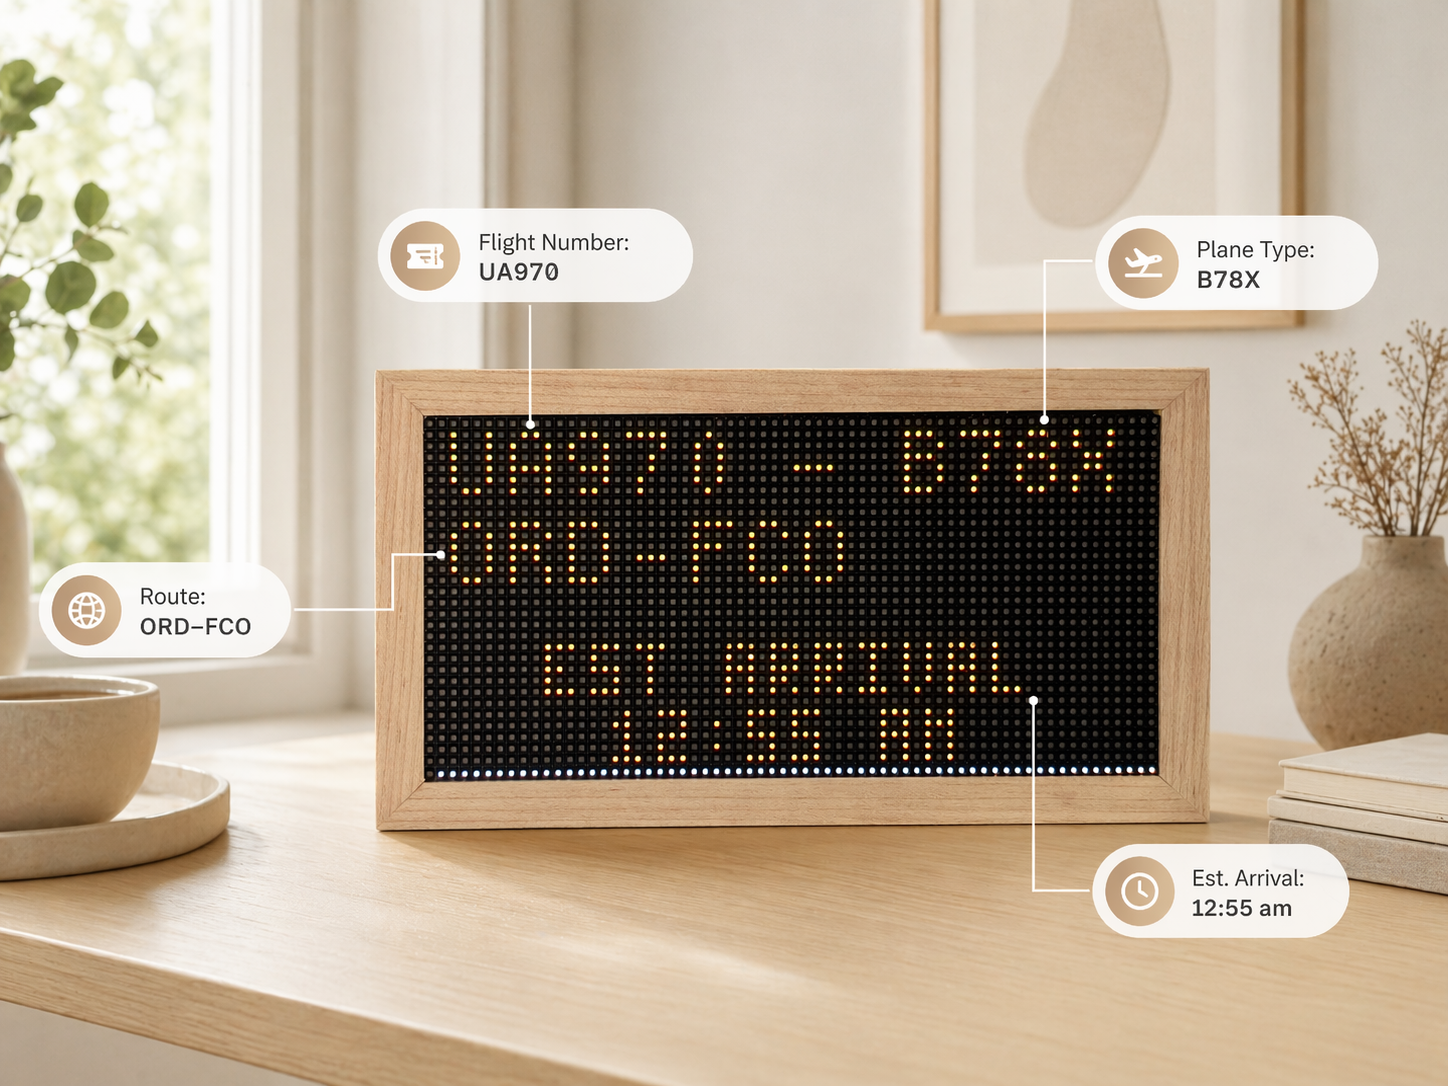
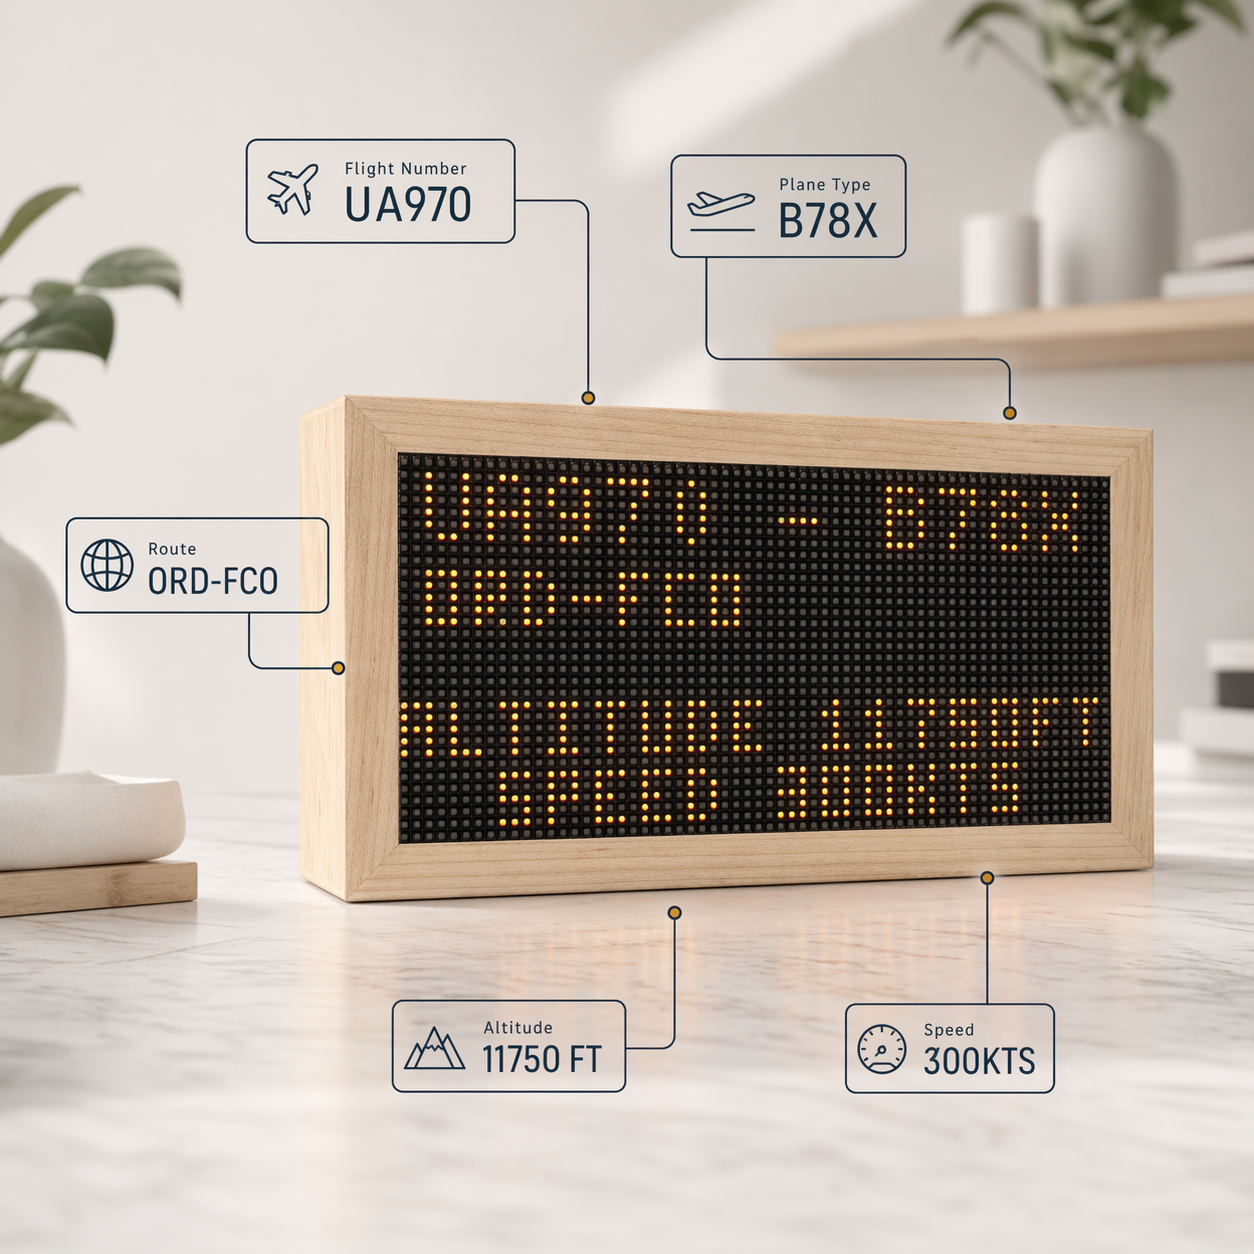
Individual Flight Tracker
Lock Mach 2 onto one flight number and follow its route, timing, status, aircraft, altitude, and speed as live data becomes available.
Flight Tracker App
For the flight you actually care about.
Enter a flight number like UA970, UAL970, AA100, or DAL123. Mach 2 saves the request, switches to the tracker scene, and updates as the cloud resolves the live flight and publishes status back to the box.
How it works
One callsign, richer context.
The tracker stores your requested flight number, uses the shared FlightAware cloud key when needed, and then follows the active flight as live data comes in.
How to use it
Type the flight, press Track.
Open the dashboard, go to Track Flight, enter the airline code plus number, and press Track. The scene may show searching while the first live snapshot loads.
What it shows
Status at a glance.
Depending on the data available, the display can show callsign, route, aircraft type, flight status, estimated time remaining, altitude, and speed.
Workflow
Tracking a specific flight
- Add the FlightAware key. Specific flight tracking uses the shared FlightAware cloud key stored securely for your box.
- Enter the flight number. Use the airline code plus number, with no spaces unless the dashboard asks for separate fields.
- Press Track. The dashboard saves the request and switches the box to the tracker scene.
- Wait for the first result. Scheduled and predeparture flights can take a little longer to resolve than flights already in the air.
Flight Number
→
FlightAware Lookup
→
Live Tracker Scene
Troubleshooting
If a tracked flight looks stuck
Give the scene time after switching. The box changes scenes first, then waits for the cloud to resolve and publish the live flight snapshot.
Check the identifier. Try the flight number exactly as shown on FlightAware, including the airline code.
Confirm the flight is active today. Future, canceled, or completed flights may not have live position data yet.
Check the cloud key. If the dashboard shows no FlightAware key, use Secure Submit or contact me and I will help get it working.
Scene Guide
Departure Board
Turn Mach 2 into a mini flight board for one airport and airline — a desk departure board with live status delivered through the shared FlightAware cloud key.
Departure Board App
A tiny FIDS for your desk.
Choose an airport, choose an airline, pick a refresh interval, and start the scene. Mach 2 becomes a mini LED flight board on your desk — an airport-style departure board that lays out live departures on the LED matrix like a miniature terminal display board.
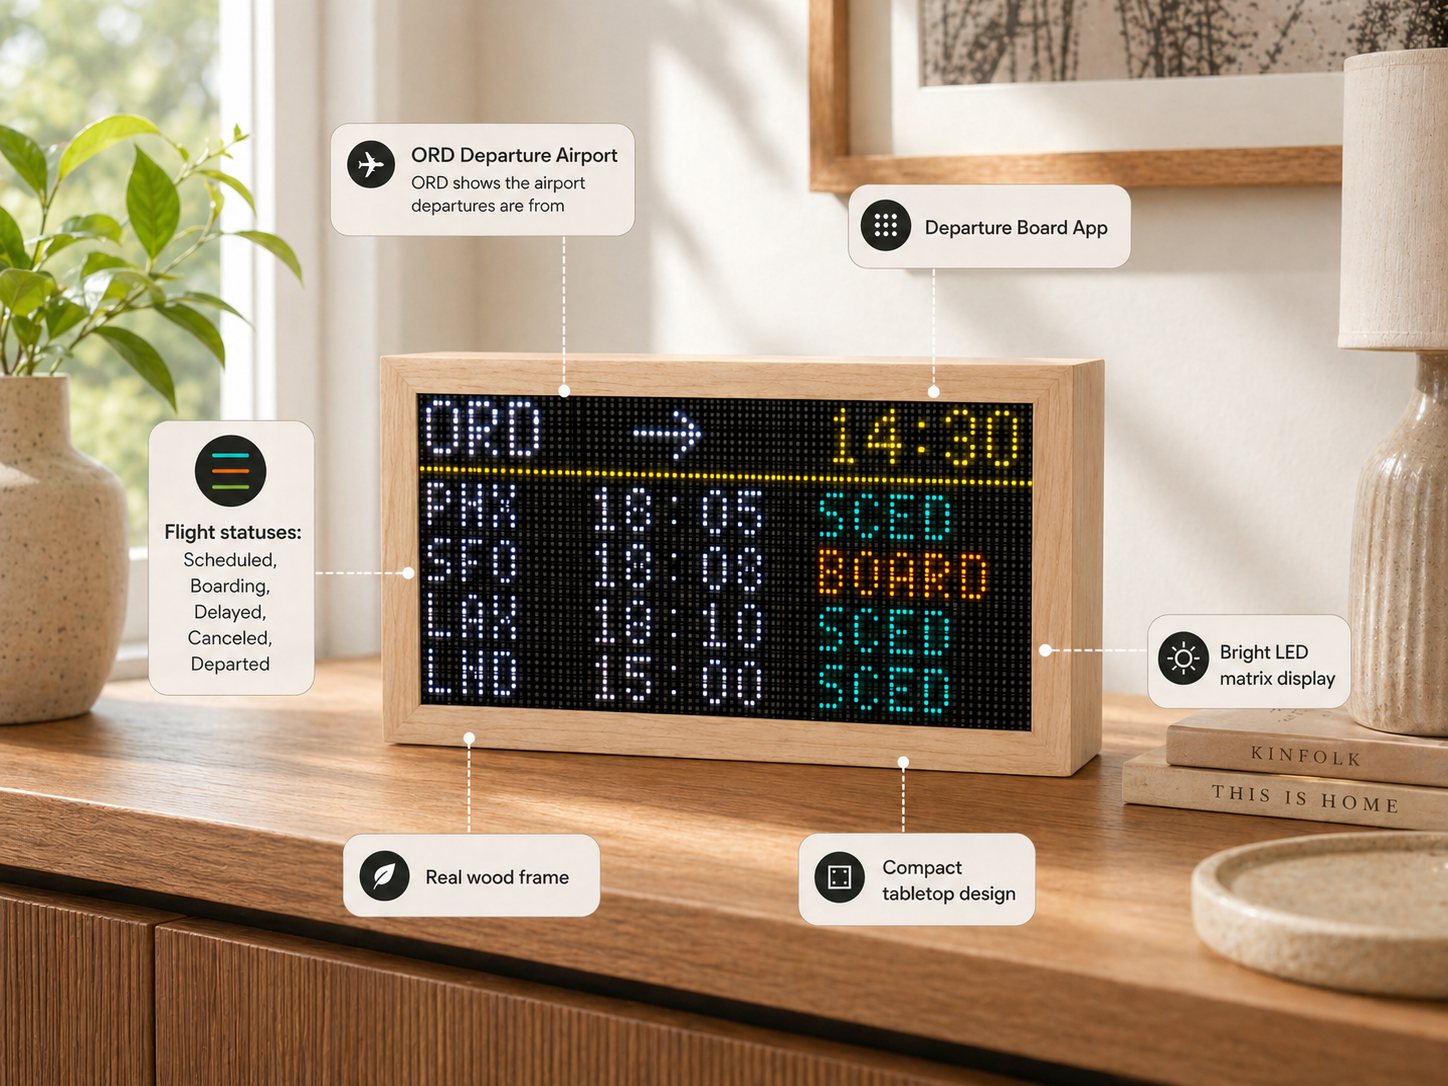
How it works
Airport plus airline.
The dashboard asks for a 3-letter airport IATA code, like ORD, and a 3-letter airline ICAO code, like UAL. The board shows matching departures by time.
How to use it
Save, then start.
Enter the airport, airline, and refresh interval, press Save Settings, then start Departure Board. The first live result can take a moment to appear.
Refresh control
Balance live data and usage.
Start around 10-15 minutes for a normal desk display. Shorter intervals feel fresher; longer intervals reduce FlightAware API usage.
What it is
An LED flight board for home.
It is the same idea as the big split-flap and LED display boards you see in airport terminals, shrunk down to a maple desk piece — your own flight board for the airport you care about.
Workflow
Starting Departure Board
- Add the FlightAware key. Departure Board uses the shared key stored securely for your device.
- Enter airport and airline. Use IATA for the airport, like ORD, and ICAO for the airline, like UAL.
- Choose refresh interval. Two minutes is available, but 10 minutes is a better everyday starting point.
- Save settings and start. After switching scenes, give the box a little time to fetch and render the first live board.
Airport + Airline
→
FlightAware Departures
→
Board Scene
Troubleshooting
If the board is blank at first
Wait after switching scenes. Departure Board may take a second before the box updates and the first live results appear.
Save settings first. Airport, airline, and refresh interval still need Save Settings before the scene has the latest values.
Check code types. Use airport IATA codes like ORD/LAX/JFK and airline ICAO codes like UAL/AAL/DAL.
Check the FlightAware key. If you do not want to create one or hit a snag, email or text me and I will help make it work.
Common questions
Flight display board FAQ
They are a Flight Information Display System, or FIDS — the airport departure and arrival boards that list flights, times, gates, and status. Mach 2's Departure Board mode is a miniature FIDS for your desk.
Yes. The Mach 2 Departure Board turns a handmade maple LED display into a home flight display board: pick an airport and airline and it shows live departures, FIDS-style, on the LED matrix.
Yes — enter any airport's 3-letter IATA code (like ORD, LAX, or JFK) and an optional airline ICAO code to filter the board to the departures you care about.
Data Source
Powered by Airplanes.live.
FlightTrackerLED uses live aircraft data from Airplanes.live, an independent ADS-B and MLAT community built by aviation people, for aviation people.
Airplanes.live
The data matters as much as the hardware.
A flight display is only as good as the network behind it. I chose Airplanes.live because they are independent, community-driven, and focused on keeping aircraft tracking useful for hobbyists, builders, researchers, journalists, emergency services, and anyone who simply loves watching the sky.
They are not trying to turn a shared hobby into someone else's locked-down asset. Their organization is structured around long-term access, community trust, and unfiltered aviation data instead of a quick exit to the highest bidder.
Why I support them
Most of us got into this because it is fun to look up, wonder where a plane is going, and share that curiosity with other people. Airplanes.live feels aligned with that version of the hobby: open, useful, enthusiast-led, and built to last.
Independent by design
Airplanes.live was formed by aviation enthusiasts and coders who wanted a stable home for aircraft tracking data. Their public commitment is that ownership cannot simply be sold, transferred, or taken over by one person.
Unfiltered tracking data
Their network aggregates ADS-B, Mode S, and MLAT data from enthusiast receivers and makes it available through a live map and API, with a strong stance against unnecessary filtering or obfuscation.
Built for the community
The point is not to squeeze the hobby for maximum profit. The point is to keep the data accessible, useful, and available to the people who feed it, build with it, and care about it.
How FlightTrackerLED uses it
A handmade box, powered by a community network.
Mach 2 turns aircraft data into something physical: a small display on your desk, shelf, or nightstand that reacts to the aircraft moving through your sky. Airplanes.live provides the kind of independent aviation data backbone that makes that experience feel connected to the wider tracking community.
I want FlightTrackerLED to support groups that protect the hobby rather than extract from it. Airplanes.live is one of those groups.
The Story
Built by a Plane Spotter
FlightTrackerLED started as a personal project. It turned into something others wanted on their desks too.
Origin
A display for obsessives.
I live under a busy flight path, and I have always looked up when a plane passes over — wondering where it is going, what airline it is, and what aircraft is making that sound. I wanted something on my desk that answered those questions the moment a flight appeared overhead.
Hardware, software, and carpentry have all been long-running passions of mine, and Mach 2 sits right at that intersection. The first prototype ran on a Raspberry Pi. It worked, but it was slow to boot, unreliable, and fussy to set up. I rebuilt it from scratch on ESP32-S3 for faster startup, lower power, and no SD card to corrupt, then built a maple enclosure because the object deserved to feel as good as the data.
There is no team, no office, and no factory line. It is just me. I hand make every single box, program each display, test it, pack it, and ship it myself. The best part is that I can keep building new scenes and features after it leaves my shop, then send them straight to your Mach 2 with OTA updates.
If the FlightAware key for specific flight tracking or Departure Board ever feels like a barrier, please email or text me. I care more about people getting to enjoy this than about making setup feel complicated, and I will help find a way to make it work.
01
No Device Subscription
One display. Free firmware updates and support.
02
Built by One Person
Every box is made, programmed, and tested by hand.
03
Always Improving
New scenes and features ship over Wi-Fi.
04
Real Support
You're emailing a real person. I answer every message.
Knowledge Base
Frequently Asked Questions
Can't find your answer? Contact us and we'll help. Comparing trackers? See the Flight Wall alternative →
Legacy Box Update
The original boxes used an earlier API path. Over time the request volume and API costs kept growing, and I needed a more sustainable setup so I could keep supporting customers without the bill getting out of hand.
Yes. Mach 2 uses Airplanes.live as the main overhead data source, runs on much more powerful hardware, and has OTA updates so fixes and provider changes can be shipped over Wi-Fi.
The newer setup has provider settings built in. A different data source can be switched on from settings, like a toggle, without replacing the box.
That is the goal. I am committed to keeping these boxes running as long as I can, and redundancy is the best path forward: multiple data options, open API guides, and OTA updates.
Product
Flight Tracker Mach 2 is a handmade ESP32-S3 LED matrix display that tracks flights in real time. It shows planes flying overhead, lets you follow specific flight numbers, supports multiple display modes and scenes, and receives free over-the-air updates so it keeps improving after it arrives.
Yes — customers often call it a flight radar display or flight radar box. Mach 2 shows the same live aircraft you'd see on a flight radar map, rendered on a handmade LED flight tracker display for your home or desk. It's an independent product and is not affiliated with Flightradar24 or any flight-tracking app.
- 64×32 LED matrix in a solid maple frame
- ESP32-S3 controller board (pre-installed)
- USB-C cable for setup and power
- Quick start card with setup instructions
Plug the included USB-C cable into any standard 5V USB-C power source — no separate computer connection is needed after Wi-Fi setup.
There is no FlightTrackerLED device subscription, monthly fee, or hidden device cost. OTA updates and support are included. Some optional advanced modes, such as specific flight tracking and Departure Board, use a FlightAware AeroAPI key that you manage through FlightAware.
- ESP32-S3 instead of Raspberry Pi — faster boot, lower power, more reliable
- Guided USB setup — no terminal commands or config files
- OTA updates — new features ship automatically
- Built-in settings dashboard — configure from any browser on your network
- Handmade and tested — every unit quality-checked before shipping
Every Mach 2 is individually assembled, programmed, tested, and quality-checked by hand before shipping. These are not mass-produced units; each display is built with care around the maple frame, LED matrix, and pre-installed controller.
Setup & Configuration
- Plug into your computer with the USB-C cable.
- Open Chrome or Edge, go to setup.flighttrackerled.com.
- Click Connect Device and follow the steps to join Wi-Fi.
- Open the tracker's IP address in any browser to set location and customize.
Chrome and Edge on desktop support Web Serial. Safari, Firefox, and mobile browsers do not. After initial setup, any browser works for the settings dashboard.
The initial Wi-Fi setup requires a desktop or laptop running Chrome or Edge because mobile browsers do not support Web Serial. After the tracker is on Wi-Fi, you can open the settings dashboard from any device on your network, including a phone or tablet.
Search by address for an automatic 20-mile area, or go to bboxfinder.com to draw a custom boundary and paste the URL into the dashboard.
The tracker automatically re-enters setup mode when it can't connect. Plug it in via USB and re-enter your credentials at setup.flighttrackerled.com.
Tracking & Features
Yes. Enter any active flight number (e.g. UA123, BA456) in the settings dashboard. Your display follows that flight in real time — altitude, speed, route — until it lands.
Your tracker monitors live ADS-B flight data inside your configured tracking area. It shows nearby aircraft with details like airline, flight number, aircraft type, altitude, speed, and route as planes enter and leave your area.
Mach 2 supports multiple apps, scenes, and display modes from the settings dashboard, including Overhead Scanner, specific flight tracking, ambient scenes, and airport-style board features. New modes can arrive through free OTA updates.
The tracker checks for updates automatically over Wi-Fi. New features, modes, and fixes download and install in the background — no action required, always free.
Yes to both. Brightness is adjustable from the dashboard. You can also filter by altitude, distance, and aircraft type to see exactly what you want.
Yes. Departure Board and specific flight tracking use a FlightAware AeroAPI key that you add in the dashboard. For normal personal use it is usually a cheap key, and you can start with a 10-15 minute refresh interval to limit API usage. If you cannot afford one or simply do not want to create one, email or text me and I will help make it work for you.
Orders & Support
Worldwide. Each unit is handmade to order — please allow a few business days for assembly and testing. International orders may be subject to customs duties.
We want you to be completely happy. If something isn't right, contact us and we'll make it right.
USB-C, 5V. Any standard USB-C charger works — phone charger, computer, or USB wall adapter. Once Wi-Fi is configured, it runs on its own with no computer attached.
Every Mach 2 includes direct lifetime support from me. There is no outsourced support queue. If you run into setup, configuration, FlightAware, or tracking issues, contact me. I am available day and night and will help you get sorted.
Still have questions?
Buyer's Guide
LED Flight Tracker Display
What an LED flight tracker display actually does, how the live data works, and what to look for before you buy one for your home or desk.
The short version
What is an LED flight tracker display?
An LED flight tracker display is a small screen, usually an RGB LED matrix, that shows real aircraft near you in real time. Instead of opening an app, you glance at a desk or shelf piece and see the planes overhead — flight numbers, altitude, speed, and where they are heading. The best ones read live ADS-B data, run without a subscription, and look like an object you actually want on display rather than a bare circuit board.
How the data works
It runs on ADS-B.
Almost every aircraft continuously broadcasts its position, altitude, and speed over a signal called ADS-B. An LED flight tracker display reads that live feed, filters it to your area, and draws the current aircraft on the matrix.
Tracking modes
Overhead, single flight, or a board.
Look for a display that does more than one thing: an overhead flight tracker for everything in your sky, a mode to follow one flight number, and an airport-style departure board. Mach 2 does all three.
No subscription
Watch out for recurring fees.
Some displays lock features behind a monthly plan. A good LED flight tracker display includes its core data and updates for free — you should only ever pay for optional power-user APIs you choose to add.
Build quality
An object, not a kit.
Enclosure matters. A handmade solid-wood frame reads as decor and makes a real gift; a bare panel or 3D-printed shell does not. Check whether it ships assembled and tested, or as a DIY build.
Checklist
What to look for before you buy
- Live ADS-B data, not delayed. The whole point of a flight tracker display is seeing planes as they pass, so confirm the feed is real-time.
- More than one mode. Overhead scanning, single-flight tracking, and a departure board keep it interesting long after the novelty.
- Browser setup. You should be able to set your location and Wi-Fi from a normal browser, with no app to install or terminal commands.
- Free updates. Over-the-air firmware updates mean the display keeps gaining features after it arrives.
- A finish you'd display. Solid wood, readable color, and a size that fits a desk or shelf.
Aircraft ADS-B
→
Your Area Filter
→
LED Display
Comparison
How the main LED flight tracker displays compare
The two most common ready-made options are the FlightTrackerLED Mach 2 and TheFlightWall. They share the same core idea — live aircraft on an LED matrix — but differ in setup, modes, build, and support. Here is an honest side-by-side to help you decide, or see the full Flight Wall alternative comparison.
FlightTrackerLED
Mach 2
Compared with
TheFlightWall
Setup without an app
Mach 2
Set up from any browser
TheFlightWall
Requires their mobile app
Dedicated tracking modes
Mach 2
Overhead, single-flight, and a real Departure Board mode
TheFlightWall
Area and flight tracking; no Departure Board mode
Enclosure
Mach 2
Handmade solid maple, built to display on a desk or shelf
TheFlightWall
Wall-mounted panel
Support
Mach 2
Direct help from the person who builds the device
TheFlightWall
Brand support, not the maker
Common questions
LED flight tracker display FAQ
No. Mach 2 has no device subscription — live ADS-B data and free OTA updates are included. Optional advanced modes can use your own FlightAware key.
They read ADS-B signals that aircraft broadcast. Mach 2 uses Airplanes.live as its primary source, with a provider toggle for redundancy.
No. Mach 2 ships fully handmade and assembled in a solid maple enclosure, and you set it up from your browser in a few minutes.
Comparison
The Flight Wall Alternative
If you're shopping for a Flight Wall alternative, the FlightTrackerLED Mach 2 is the handmade-maple, desk-friendly take on a live LED flight tracker — three dedicated modes, browser setup, and no subscription. Here's an honest side-by-side.
The short version
A desk piece, not a wall panel
Both show real aircraft on an LED matrix from live ADS-B data. The difference is the experience around it. TheFlightWall is a wall-mounted display set up through their mobile app. The Mach 2 is a solid-maple object made to sit on a desk or shelf, set up from any browser, with dedicated Overhead, Individual Flight, and Departure Board modes — and no recurring fees. If you want wall art, theirs is a fine choice; if you want a handmade desk piece and a real gift, the Mach 2 is the alternative people are looking for.
Form factor
Desk, not wall.
The Mach 2 is a freestanding solid-maple piece sized for a desk or shelf. TheFlightWall is designed to hang on a wall as a flat panel. Pick the one that fits where you'll actually keep it.
Setup
Browser, not an app.
Set your location and Wi-Fi from any browser — there's no app to install. You keep full control of the device on your own network.
Modes
Three dedicated modes.
Overhead Scanner, Individual Flight Tracker, and a real Departure Board mode — each a purpose-built way to watch the sky.
Cost of ownership
No subscription.
Live ADS-B data and over-the-air firmware updates are included for free. Optional power-user modes can use your own FlightAware key — only if you want them.
Side by side
Mach 2 vs TheFlightWall
An honest comparison of the two most common ready-made LED flight trackers. TheFlightWall is well-reviewed and great as wall art; the Mach 2 wins for a handmade desk piece, dedicated modes, and app-free setup.
FlightTrackerLED
Mach 2
Compared with
TheFlightWall
Where it lives
Mach 2
Freestanding maple piece for a desk or shelf
TheFlightWall
Wall-mounted panel
Setup without an app
Mach 2
Set up from any browser
TheFlightWall
Configured through their mobile app
Dedicated tracking modes
Mach 2
Overhead, single-flight, and a real Departure Board mode
TheFlightWall
Area and flight tracking; no Departure Board mode
Enclosure
Mach 2
Handmade solid maple, made to order
TheFlightWall
Wall-mounted panel
Subscription
Mach 2
None — data and OTA updates included
TheFlightWall
No required subscription
Support
Mach 2
Direct help from the person who builds the device
TheFlightWall
Brand support, not the maker
Customer Reviews
Rated 5.0 ★ by 106 verified owners.
FlightTrackerLED Mach 2 has a 5.0-star average across 106 verified customer reviews. A few favorites are shown here — more live on the Mach 2 product page.
"John has been so helpful. If you have any issues at all, he will graciously walk you through each step, and he responds very quickly. This is a great gift for a plane fanatic — my husband loves it! (And I do too!)"
"Absolutely made my husband's Christmas. It is extremely hard to buy for someone who has everything, and this exceeded expectations! Thank you for this amazing little box of fun!"
"I sincerely love this item! I had a bit of trouble connecting, as my PC was six years old, and my Mac didn't want to cooperate. But John patiently helped me throughout the process. Truly outstanding customer service! The quality is first-rate, and it's a terrific addition to all my aviation gadgetry. Can't recommend this enough--worth every penny!"
Common questions
Flight Wall alternative FAQ
Yes. The FlightTrackerLED Mach 2 is a handmade maple LED flight tracker that shows live aircraft from the same kind of ADS-B data, with browser setup, three dedicated tracking modes, and no subscription. It is built as a desk piece rather than a wall panel.
TheFlightWall is a wall-mounted panel set up through a mobile app, with area and flight tracking. The Mach 2 is a freestanding solid-maple display set up from any browser, with dedicated Overhead, Individual Flight, and Departure Board modes. Both run on live ADS-B data with no required subscription.
No app and no device subscription. You set it up in a browser, and live data plus over-the-air firmware updates are included. Optional advanced modes can use your own FlightAware key if you choose.
Yes — TheFlightWall is a legitimate, well-reviewed LED flight tracker and a popular choice for wall-mounted aviation decor. The FlightTrackerLED Mach 2 is an alternative if you'd prefer a handmade solid-maple desk piece, app-free browser setup, and three dedicated tracking modes.
Policy
Shipping & Return Policy
Plain-language order, shipping, return, and support terms for FlightTrackerLED.
Shipping Policy
Please note: Every FlightTrackerLED display is handmade to order by a single maker. Each unit is built, programmed, and tested by hand before it ships, so processing times can vary depending on order volume and component availability. I always work to get orders out as soon as possible.
Processing Time
Because each FlightTrackerLED is built individually, please allow 3-10 business days for your order to be assembled, programmed, and tested before it ships. Most orders ship sooner, but during periods of high demand or limited component supply, processing may take longer. If your order requires extended processing time, I will contact you by email at the address provided at checkout.
Shipping Methods & Delivery Time
- Domestic orders: shipped via USPS or UPS with tracking. Typical delivery time after shipment is 2-5 business days, depending on destination and the shipping option selected at checkout.
- Express or priority shipping: available at checkout when supported. Express shipping speeds up transit time, but it does not change processing time unless arranged in advance.
- International orders: available on a case-by-case basis. Please contact john@flighttrackerled.com before ordering.
Tracking
Once your order ships, you will receive a shipment confirmation email with the carrier and tracking number. Please allow 24 hours for tracking updates to appear in the carrier system after the label is created.
Shipping Address
It is the customer's responsibility to provide a complete and accurate shipping address at checkout. FlightTrackerLED ships to the address provided on the order. If a package is returned as undeliverable because of an incorrect or incomplete address, the customer is responsible for the cost of re-shipping.
Lost, Delayed, or Damaged Shipments
If tracking shows your package as delivered but you have not received it, please first check with neighbors, family members, your front desk or building manager, and your local post office. If you still cannot locate it, contact john@flighttrackerled.com within 7 days of the marked delivery date so I can help open a carrier investigation.
If your package arrives damaged, contact me within 7 days of delivery with photos of the packaging and the product. I will work with you to repair, replace, or otherwise make it right.
Setup & Customer Support
Every FlightTrackerLED is tested before it ships. If you run into setup difficulty, please reach out. I respond as quickly as possible and will help you get your display working.
Made-to-Order Disclosure
Because each unit is built individually for the customer, FlightTrackerLED does not maintain a same-day shipping inventory. Thank you for your patience and for supporting a small, owner-operated maker business.
Return & Refund Policy
FlightTrackerLED displays are handmade to order by a single maker. Each unit is built, programmed, and tested by hand for the customer who ordered it. I stand behind every unit shipped and want every customer to enjoy theirs.
30-Day Return Window
You may request a return or refund within 30 days of the delivery date of your order. Requests received after 30 days from delivery are not eligible for return or refund except where required by applicable law, or at my discretion in cases of clear product defect.
Conditions for a Refund
- The return request is made within 30 days of delivery.
- The item is returned in its original, unaltered condition, with all original packaging and accessories.
- The item has not been physically modified, taken apart, or had its firmware or hardware tampered with. Tampering or attempted modification voids return eligibility.
- The customer obtains a Return Authorization from FlightTrackerLED by emailing john@flighttrackerled.com before shipping anything back. Returns sent without authorization may be refused.
- Return shipping is the responsibility of the customer except in cases where the unit arrived defective or damaged.
Defective or Damaged on Arrival
If your unit arrives damaged or has a manufacturing defect, please contact john@flighttrackerled.com within 7 days of delivery with photos of the packaging and the product. I will repair, replace, or refund as appropriate at no additional cost to you.
Setup Issues
Many "it doesn't work" reports turn out to be straightforward setup questions. Before requesting a return, please contact me. I routinely walk customers through setup, and where a customer's unit cannot be made to work remotely, I will offer a free repair, replacement, or upgrade. Most setup issues are resolved without any return being necessary.
Non-Returnable Items
- Custom-built units that include personalized text, custom graphics, or buyer-specified hardware modifications.
- Units that have been physically opened, tampered with, or had their firmware extracted or modified.
- Items returned more than 30 days after delivery.
Refund Processing
Once a returned unit is received and inspected, I will notify you of the outcome. Approved refunds are issued to the original payment method, typically within 3-7 business days of inspection. Original shipping charges are non-refundable.
Chargebacks
Customers who experience an issue are asked to please contact john@flighttrackerled.com first. As a small, owner-operated maker business, I will always work in good faith to repair, replace, or refund promptly. Filing a chargeback before contacting me, or while remediation has already been offered and accepted, prevents me from helping resolve the issue and may delay the resolution.
Contact
For any return question or special request, please email john@flighttrackerled.com. I aim to respond within one business day.
Shop
The Mach 2
A finished, handmade LED flight tracker display with the Overhead Scanner, specific flight tracking, Departure Board mode, scenes, filters, and free OTA improvements — a memorable aviation gift.
Mach 2
ESP32-S3 LED Flight Display · Solid Maple
Live ADS-B flight tracking on a 2,048-pixel full-color LED matrix. Watch overhead aircraft, follow specific flight numbers, open Departure Board mode, switch display modes, adjust brightness, and filter what appears. Set up in minutes, configure from any browser, and get free OTA updates for life.
What's Included
- 64×32 LED matrix in solid maple frame
- ESP32-S3 controller board (pre-installed)
- USB-C cable for setup and power
- Quick start card
- Overhead Scanner, specific flight mode, Departure Board mode, scenes, and filters
- Free lifetime OTA updates
- Free lifetime support
$449.99
USD · Free worldwide shipping · Handmade to order
Checking availability...
ESP32-S3
Purpose-built controller, fast boot, no SD card to corrupt.
Maple
Handmade wood enclosure, not a 3D-printed LED matrix shell.
Statement
Built to sit out on a desk, shelf, or console and start conversations.
OTA
New scenes, fixes, and features can ship straight over Wi-Fi.
What's inside
Built for flight tracking and beyond.
Track individual flights by flight number, watch planes overhead in real time, open Departure Board mode, or switch to one of the built-in display modes. Mach 2 runs on ESP32-S3 and gets free OTA updates so it keeps improving after it arrives.
Track Any Flight
Enter a flight number and follow a specific flight in real time, or let Mach 2 scan for aircraft passing through your area automatically.
Multiple Display Modes
Switch between apps, scenes, and visualizations, including Departure Board, clock, weather, custom text, and more.
Free OTA Updates
New features and improvements ship over the air. Your display keeps getting better long after it arrives.
Fully Customizable
Adjust brightness, filters, tracking zones, and display preferences so the display fits your space exactly.
How it works
From unboxing to tracking.
Mach 2 connects to Wi-Fi through the browser setup tool at setup.flighttrackerled.com, then pulls live flight data from ADS-B sources and displays it on a 2,048-pixel LED matrix. After it is on your network, use the built-in settings page to configure location, modes, filters, and brightness.
1
Plug in & connect
Plug Mach 2 into your computer with USB-C, open setup.flighttrackerled.com in Chrome or Edge, then connect the display to Wi-Fi.
2
Configure settings
Once Mach 2 is online, open its settings page from the same Wi-Fi network to set your location, tracking zone, brightness, filters, display mode, and Departure Board preferences.
3
Watch flights live
Aircraft data streams in real time from ADS-B sources, including flight numbers, airlines, altitude, speed, and aircraft type.
4
Track specific flights
Enter any flight number to follow a specific plane. The display shows its route and status until it lands or leaves range.
What's in the box
Everything you need, nothing you don't.
LED Matrix Display64x32 RGB LED panel with 2,048 individually addressable pixels, installed in the enclosure and ready to go.
Handcrafted Wood EnclosureEach enclosure is hand-built, sanded, and finished to look at home on a desk, shelf, or nightstand.
ESP32-S3 ControllerAdafruit MatrixPortal S3 with Wi-Fi, USB-C, and 8MB flash, pre-flashed with Flight Tracker firmware.
Power Supply & Cable5V 5A DC adapter and USB-C cable included. Plug into any standard outlet and you're up and running.
Technical Specs
What's under the hood.
ProcessorESP32-S3 (Adafruit MatrixPortal S3)
Display64x32 RGB LED matrix (HUB75)
Resolution2,048 individually addressable RGB pixels
ConnectivityWi-Fi 2.4GHz, USB-C
Data SourceLive ADS-B flight tracking via cloud API
Power5V 5A DC supply included
EnclosureHandcrafted wood frame, assembled
UpdatesFree OTA firmware updates over Wi-Fi
Dimensions8.5" x 3.75" x 5"
SetupBrowser-based USB Web Serial, no app needed
Side by side
How Mach 2 compares.
Both are real-time LED flight displays. Where Mach 2 differs comes down to how it's built, who's behind it, and how it's set up. Cross-shopping? See the full Flight Wall alternative comparison.
FlightTrackerLED
Mach 2
Compared with
TheFlightWall
No app required
Mach 2
Set up from your browser
TheFlightWall
Requires their mobile app
Open build process
Mach 2
Electronics, testing, and product development are shown openly
TheFlightWall
Internal electronics aren't publicly documented
Live-data feel
Mach 2
Short-burst Live Mode lets speed, altitude, and climb rate visibly tick
TheFlightWall
Displays live aircraft metrics
Departure Board mode
Mach 2
Built as its own display mode
TheFlightWall
Area and flight tracking; no Departure Board mode
Direct maker support
Mach 2
Help from the person building and improving the device
TheFlightWall
Brand support, not the maker
Product philosophy
Mach 2
Handmade, transparent, app-free, aviation-first
TheFlightWall
Viral prototype turned consumer product, app-controlled
Customer Reviews
Verified reviews of the Mach 2.
Real first-party customer reviews, shown with the buyer's public name and review date.
"John has been so helpful. If you have any issues at all, he will graciously walk you through each step, and he responds very quickly. This is a great gift for a plane fanatic — my husband loves it! (And I do too!)"
"The tracker looks great!"
"This is a great gadget and a must have for aviation geeks."
"Absolutely made my husband's Christmas. It is extremely hard to buy for someone who has everything, and this exceeded expectations! Thank you for this amazing little box of fun!"
"Seller was very helpful and I like the product."
"Just as described, can't wait to give it as a gift! Had a little wifi-troubleshooting but the seller responded very quickly and I got it up and running easily after."
"great product my fiancé loved it!"
"Item just as described and worked well with the instructions provided on the description page."
"We have had the Flight Radar Box about 2 weeks and we have thoroughly enjoyed it. We’ve got it positioned so we can see everything that’s coming over our house. The set up was a little tricky but the seller did try to help us with it. Once we were connected, the rest was pretty easy. Perfect gift for anyone that loves aviation."
"Amazing product! Purchased for my Dad."
"Great build. Easy set up with instructions!"
"Very well built with a beautiful display. Seller was extremely helpful getting it set up. Wife loved it."
Read all customer reviews106 total
"The seller was super helpful!"
"I sincerely love this item! I had a bit of trouble connecting, as my PC was six years old, and my Mac didn't want to cooperate. But John patiently helped me throughout the process. Truly outstanding customer service! The quality is first-rate, and it's a terrific addition to all my aviation gadgetry. Can't recommend this enough--worth every penny!"
"Awesome device, lots of fun to watch planes overhead with the family."
"Bought this for my boyfriend who is a huge aviation nerd. He hasn’t stopped playing with it since it arrived."
"John’s customer service is next level. Had a small issue and it was resolved same day."
"This thing is so cool! The display is crisp and it picks up so many flights."
"Perfect gift for my dad. He watches it every evening now."
"Super easy setup once John walked me through it. Highly recommend!"
"My son is obsessed with this. Best purchase I’ve made in a while."
"Beautifully made and works flawlessly. John is the best."
"This is my second one - bought one for home and one for the office."
"My husband loves watching the planes at night. Great conversation piece."
"Fast shipping and excellent support. Very happy with the Mach 2."
"Bought for my pilot friend - he was blown away by it."
"Setup was smooth thanks to the detailed instructions and John’s help."
"This is such a neat little device. My whole family enjoys it."
"John really stands behind his product. Great experience all around."
"My dad checks it every morning. He loves seeing all the traffic."
"Excellent quality and very responsive seller."
"Bought two - one for each of my aviation-obsessed brothers."
"Works perfectly and looks awesome on the shelf."
"The best gift I’ve given in years. My husband is hooked."
"Super cool gadget. John helped me get it connected in minutes."
"My son wants to be a pilot and this has been amazing for him."
"Very satisfied. Looks premium and performs great."
"John is the most helpful seller I’ve ever dealt with."
"This thing is addictive to watch. So many planes!"
"Bought as a Christmas gift and it was a huge hit."
"My father-in-law loves it. Spends hours watching the display."
"Fantastic product and even better customer service."
"Works exactly as advertised. Very happy with this purchase."
"Bought for my husband’s birthday. He says it’s his favorite gift."
"John was super responsive when I had setup questions."
"This is so much cooler than I expected. Highly recommend!"
"Perfect for any aviation enthusiast."
"My kids love pointing out the planes on the display."
"Great quality build and very accurate tracking."
"John helped me get it running in under 10 minutes. Awesome!"
"This has been a game changer for my flight tracking hobby."
"Super cool gadget. My boyfriend won’t stop talking about it."
"Excellent product and outstanding support."
"Bought two as gifts — both recipients loved them."
"The display is beautiful and the device is very well made."
"John is incredibly helpful. 10/10 experience."
"My uncle who is a retired pilot loves this thing."
"Easy to set up after I got a quick tip from John."
"This is such a fun device. Worth every penny."
"My husband is addicted to watching it."
"Great product with fantastic customer service."
"Bought for my dad and he uses it daily."
"Very impressed with the build quality."
"John responded within minutes when I needed help."
"This makes a fantastic gift for any plane lover."
"Love watching all the flights go by in real time."
"Setup was quick and easy thanks to the seller."
"My whole family enjoys looking at this."
"Excellent device. Would buy again."
"John went above and beyond to help me."
"This is so much fun to have at home."
"Best gift for my aviation-obsessed husband."
"Very accurate and the display looks premium."
"John’s support made the whole process smooth."
"My kids love identifying planes on it."
"Fantastic product. Highly recommend."
"Setup was easy after John helped me."
"My dad uses this every single day."
"Great quality and fast shipping."
"This is such a cool gadget!"
"John is an amazing seller. Very responsive."
"My husband loves it so much."
"Works perfectly and looks great."
"Best gift idea for plane lovers."
"Very happy with this purchase."
"John helped me troubleshoot quickly."
"My family enjoys this every night."
"Super cool device. Worth it."
"Excellent customer service as always."
"My dad is obsessed with this."
"Great product and very well built."
"John made setup stress-free."
"This is addictive to watch!"
"Perfect for any aviation fan."
"Very pleased with my purchase."
"My husband says this is his favorite thing."
"Great quality and fast support."
"Bought for my brother — he loves it."
"This device is so much fun."
"John’s help was invaluable."
"Beautiful display and accurate tracking."
"My whole family is hooked on this."
"Excellent product all around."
"Best gift I’ve given in a long time."
"John provides top-tier support."
"This is an awesome little device. Highly recommend to everyone!"
Existing Owner Upgrade
Mach 2 Drop In
A replacement ESP32-S3 controller and USB-C power setup for people who already own a legacy FlightTrackerLED box and want the newer Mach 2 electronics.

Verified Upgrade
Mach 2 Drop In
ESP32-S3 Controller · USB-C Power · Existing Boxes Only
For owners of the legacy Raspberry Pi-based FlightTrackerLED box. Keep your existing LED matrix and enclosure, remove the Raspberry Pi wiring, connect the HUB75 ribbon and power leads to the new ESP32-S3 board, then power it up over USB-C.
What You Get
- Mach 2 ESP32-S3 controller board, programmed and tested
- USB-C power setup for the new controller
- Mach 2 firmware with OTA updates and current scenes
- Access to Overhead Scanner, specific flight tracking, Departure Board, settings, and filters
- Direct install support if you want help swapping it in
Existing owners only.
This upgrade is for people who already purchased a legacy FlightTrackerLED box. Orders are verified before shipping using your original order email, order number, or an upgrade code.
$50
USD · Free shipping · Existing owners only
Not sure if you qualify?
This kit is only for existing owners of the legacy FlightTrackerLED box. If you are unsure, message me first with your order number before purchasing.
Drop In
Uses your existing box, LED matrix, and enclosure instead of replacing the whole display.
ESP32-S3
Moves legacy Raspberry Pi units onto the faster, lower-power Mach 2 platform.
USB-C
Power the new controller through USB-C after reconnecting HUB75 and power wiring.
Verified
Built for existing owners only, with order email, order number, or upgrade code verification.
How it installs
Keep the box. Swap the brains.
The Drop In kit is meant to make the upgrade as simple as possible for legacy boxes. You are not rebuilding the enclosure or replacing the LED matrix. You are moving the existing HUB75 and power connections from the Raspberry Pi setup to the Mach 2 ESP32-S3 controller.
1
Unplug the legacy controller
Power down the box, then disconnect the current HUB75 ribbon and power wiring from the Raspberry Pi hardware.
2
Connect the Mach 2 board
Plug the existing HUB75 ribbon and display power leads into the new ESP32-S3 controller board.
3
Power with USB-C
Connect USB-C power, boot the board, and use the current setup flow to get it onto Wi-Fi.
4
Configure and update
Set your location, modes, filters, brightness, and FlightAware key, then keep getting Mach 2 OTA updates.
Compatibility
Made for legacy FlightTrackerLED boxes.
You already own a legacy boxThis is not a standalone finished display. It is an upgrade kit for customers with a legacy FlightTrackerLED box.
Your LED matrix staysThe kit reuses your current HUB75 LED matrix and enclosure, so the swap stays focused on the controller and power path.
Verification requiredUse your original order email, order number, or upgrade code. I verify before shipping so this stays reserved for existing owners.
Support includedIf you are unsure about the ribbon cable, power wires, or setup flow, contact me and I will walk you through it.
Developer Hardware
MatrixPortal Dev Kit
The same handcrafted wood display hardware as a blank canvas for your own code. No pre-loaded apps. No refunds. Built for developers and makers.

Developer Hardware
MatrixPortal Dev Kit
ESP32-S3 LED Display · Handcrafted Wood Enclosure
Your canvas, your code. This is finished hardware — screen, frame, controller, and power — ready for you to build whatever you want. Flash your own firmware, build your own apps, or use the included development infrastructure to get started faster.
What You Get
- Adafruit MatrixPortal ESP32-S3 controller board
- 64×32 RGB HUB75 LED matrix installed in enclosure
- Handcrafted wood frame, assembled and finished
- 5V 5A power supply and USB-C cable
- MQTT broker access for real-time data push and device messaging
- Admin panel, device provisioning flow, backend API access, and hosted OTA update pipeline
- Compatible with Arduino, CircuitPython, and ESP-IDF workflows
Developer product. No refunds.
Ships with no apps or pre-loaded software. You are responsible for firmware, code, configuration, and integration. This product requires technical experience. All Dev Kit sales are final.
$499
Checking Shopify availability...
Want one from the next batch?
Dev Kits are sold out right now. Tell me what you want to build and I will get back to you within 12 hours.
Blank Canvas
No pre-loaded apps. You flash the firmware and decide what the display becomes.
Finished Wood
A real handcrafted enclosure, not a bare panel or loose development board.
Cloud Tools
MQTT, provisioning, admin tooling, backend API access, and hosted OTA pipeline.
Final Sale
Developer-only product. Technical setup is your responsibility. No refunds or returns.
Get In Touch
We're Here
Questions about setup, your order, or anything else — we'll get back to you fast.
Contact
Say Hello.
Every Mach 2 comes with direct lifetime support from me. If you need help with setup, FlightAware, a specific flight, Departure Board, or anything else, email or text me. I am available day and night and will always help, which is not something every flight box on the market can say.
Response Time
Usually within a few hours
Quick Links
Setup Guide · FAQ
Updates & field notes
This week
Roadmap
v1.08
In progress
May 31, 2026
Live mode & most-tracked search
What's in active development for v1.08 — two of the most-requested ideas from the Hangar, now being built for real.
- Most-tracked search — search for and pull up whichever aircraft the tracking community is watching most right now.
- Live mode — real-time flight stats that refresh at very high frequency for a truly live readout. It's intensive, so it runs in 2-minute bursts at a time.
In active development now — it'll arrive over OTA when it's ready, like every release.
Firmware
v1.07
Shipped
May 28, 2026
Free flight tracking once it's airborne
The step teased in v1.06 has shipped: you can track a specific flight without your own FlightAware key. Enter a flight number and, once the aircraft is in the air, the box follows it live from our own backend — included free with every Mach 2.
- No FlightAware key needed — free individual-flight lookups through our backend API.
- Picks up once airborne — partial tracking that locks on once the plane is in the air, rather than gate-to-gate.
- Live in-flight data — position, altitude, and speed update as the flight moves.
Shipped via OTA — use Settings → Firmware → Check for update if your box hasn't picked it up yet.
Firmware
v1.06
Shipped
May 20, 2026
v1.06 - stronger API and flight lookup
This is a reliability firmware release, not a flashy scene release. The goal is to make the existing tracking path steadier before the next bigger backend step lands.
What changed:
- More tolerant API path - the box handles provider hiccups, stale responses, and partial flight data more gracefully.
- Stronger flight lookup - callsigns that change shape, delayed route data, and upstream disagreements are less likely to knock tracking off course.
- Steadier individual flight tracking - tracked flights should get stuck less often and recover better when a provider sends old or incomplete data.
The free individual flight tracker backend is the next bigger step and is coming in v1.07. v1.06 is the cleanup release that makes that path more dependable.
Firmware
v1.05
Shipped
May 10, 2026
v1.05 — infrastructure release
Mostly under-the-hood work this week. v1.05 isn't about new visible features — it's the foundation that makes the next few releases possible. You'll feel it as faster data, fresher routes, and fewer ghost disconnects.
What changed:
- Faster overhead data — the Overhead Scanner now updates in near-real-time instead of waiting on a fixed refresh interval.
- Redundant data path — a secondary feed is wired up alongside Airplanes.live so the box keeps tracking if the primary has a hiccup, with smarter handling when sources disagree.
- Cleaner tracked-flight rendering — leaner data on the wire frees up cycles for the matrix.
- Smarter route lookups — the box self-corrects when a flight's route info goes stale.
- Fresher route cache — flight numbers and route metadata update more often.
- Tighter network hygiene — fewer false disconnects, faster pickup of new patches.
- More resilient first-boot — the handoff from the production flasher is sturdier.
What this isn't: v1.05 doesn't add new user-visible scenes. The bigger feature work (live mode for tracked planes, night mode, alerts, specific plane alerts, most-tracked view) is in active development — see the Roadmap cards below — and is targeted for v1.07+.
v1.05 has shipped through OTA. If your box has not picked it up yet, use Settings → Firmware → Check for update.
Firmware
v1.04
May 7, 2026
Departure Board blackouts, gone.
Patch for the issue a few of you reported in the Hangar — Departure Board would briefly blank for ~10 seconds when the upstream feed returned an empty response. The renderer now treats empty responses as "hold last frame" instead of clearing the matrix.
- Fix: empty schedule responses no longer clear the display
- Fix: small wrap issue on long flight callsigns
- Improvement: lower memory footprint in Departure Board scene
OTA goes out tonight — your box will pick it up automatically.
Firmware
v1.03
Apr 24, 2026
Overhead scanner gets sharper
Big update. The Overhead Scanner now smooths motion between data updates, which makes traffic feel like it's actually moving across the sky rather than teleporting.
- Smoother motion between updates
- New altitude-band color ramp (configurable)
- Filter by aircraft type from the dashboard (jet / prop / heli)
- Fixed: rare crash on certain callsigns
Earlier this month
Store
May 1, 2026
Drop-In replacement for existing users
If you already own an original FlightTrackerLED box, the Drop-In is the upgrade path: keep your maple enclosure, swap the brain. You ship me back the old controller, I ship you a new Mach 2 board pre-flashed with the latest firmware, and you pop it into the same frame.
How the swap works, briefly:
- Order the Drop-In from the store (verification at checkout — original-owner only).
- I email a prepaid return label for your old controller.
- Your new Mach 2 board ships within ~3 business days, pre-paired with your account so it boots straight into setup.
- Open the back panel, unscrew two M3s, lift out the old board, drop in the new one, reconnect the matrix ribbon. ~5 minutes.
- Run through the browser setup wizard once and you're on the latest firmware (currently v1.06) with OTA updates from there.
No new enclosure, no new sale price — just the parts that needed updating.
Roadmap
In progress
Apr 22, 2026
Specific plane alerts
Goal: follow individual aircraft. Add tail numbers (N12345) or callsigns (UAL2293) to a per-box watchlist. The matrix flashes a small marker and — if you've got Alerts on — pings your phone when a watched aircraft enters your overhead window.
Tail number vs callsign:
- Tail number reliably identifies a specific aircraft across days, routes, and pilots. Use this if you want to catch one particular plane.
- Callsign identifies a scheduled flight on a given day. Use this if you want any flight on the route, regardless of which physical aircraft happens to be assigned.
Real-world uses already coming up in the Hangar: catching a partner's inbound, watching a vintage warbird based at the local field, or just following a route that's been a quiet curiosity for years. Watchlist will be per-device at launch; multi-box sync is on the longer list.
Roadmap
In progress
Apr 18, 2026
Alerts — push & email
Goal: get a notification when something interesting happens overhead, without having to babysit the matrix.
What you'll be able to subscribe to:
- Emergency squawks (the standard aviation distress codes)
- Military traffic
- Watchlist hits — your own tail numbers and callsigns (see the next card)
- Rare-bird flags — vintage props, custom-tagged jets, and other oddities worth looking up for
Channels (planned): web push, email, and an on-matrix flash. All independently togglable per category. Default state will be off — alerts only fire when you've explicitly opted in to a category.
Configuration will live at Settings → Alerts.
Roadmap
In progress
Apr 10, 2026
Night mode — sleeps with the city
Goal: a brightness curve that follows local sunrise and sunset, plus an optional "quiet hours" window where the matrix sleeps regardless of light level. Set it once, the box manages itself.
What you'll see: brightness eases through twilight into the dark hours and back up to dawn — no hard cutoffs, no jarring transitions.
Quiet hours: optional override (e.g. 22:00 → 07:00) where the matrix dims to off regardless of where the sun is. Useful if your box lives in a bedroom or you just don't want a glow at 3am.
Thanks to everyone in the Hangar weighing in on the curve shape — leaning toward the soft easing over linear and stepped variants. Configuration target: Settings → Display → Night mode.
Firmware
v1.02
Apr 9, 2026
Tiny patch — Wi-Fi reconnect after router reboots
Small one. Some routers were taking long enough to come back up after a power blip that the box would give up reconnecting. It's now more patient — backs off and keeps retrying through extended outages.
Roadmap
In progress
Apr 8, 2026
Live mode for every box
Goal: keep what's on your matrix matched to what's actually overhead in near real-time, instead of refreshing every minute or so.
Rollout strategy: rather than gating Live mode behind an opt-in toggle, the plan is to ship it on by default for every Mach 2 — no fallback, no toggle, no settings hunt.
What you'll notice when it ships: overhead traffic will feel alive. Aircraft that currently "pop" between snapshots will glide. Departure Board will update the moment a flight pushes back, not on the next refresh tick.
Status: the v1.05 infrastructure release laid the foundation this depends on. v1.06 strengthened the API and lookup path, and the next backend step is targeted for v1.07.
Store
Apr 4, 2026
Updated shipping & return policy
Cleaned up the policy page with plain-language order processing times, return windows, and what to do if your box arrives damaged. Nothing changed materially — just easier to read.
Firmware
v1.01
Apr 1, 2026
Departure Board: airline color hints
Subtle but nice — Departure Board now tints the flight number with a per-airline accent, so a row of UAL flights looks visually distinct from a row of DAL flights at a glance. Configurable from the dashboard if you want to override.
Roadmap
Planned
Mar 28, 2026
Multi-airport Departure Board
Right now Departure Board pins to one airport. The plan is to let you cycle through up to 3 airports on a configurable rotation — useful if you live between two hubs or want to keep tabs on a destination.
Status: scoped, designed, not started. Coming after the v1.05 and v1.06 reliability work — most likely v1.07 or later.
Firmware
v1.00
Launch
Mar 25, 2026
v1.00 — first ship
The foundation. v1.00 is the firmware that powered the very first Mach 2 boxes off the bench — every box now ships with the latest firmware (currently v1.06) and OTA-updates from there, but this is where the line started.
Scenes shipped at launch:
- Overhead Scanner — live aircraft data from Airplanes.live, rendered to your local sky window
- Departure Board — flight number, gate, and status feed for one configurable airport
- Individual Flight Tracker — pin a specific flight and follow it across legs and days
Setup: browser-based wizard at setup.flighttrackerled.com. No app, no account required. Up and running in just a few minutes.
Connectivity: Wi-Fi with auto-reconnect after router reboots. OTA update channel established for everything that comes after.
Controls: brightness, scene rotation, and per-scene config from the on-device dashboard.
v1.00 is the version that started it all. Everything in the log above is built on top of this.
No entries match that filter.
How it works
How Mach 2 Connects
A plain look at how the Mach 2 LED flight tracker gets its data, what actually runs on the device, how updates reach the fleet, and where the project came from.
Connection model
MQTT in, pixels out.
Mach 2 keeps a single secure connection to our hosted MQTT broker for live flight data, your saved settings, and firmware updates. Everything you see is rendered locally on the device — the cloud only ships data, never frames.
Privacy
Your network stays yours.
The box makes an outbound connection to our broker and nothing else. There is no inbound port, no remote shell, and no access to other devices on your Wi-Fi. Drop it on a guest network and it behaves exactly the same.
On the device
Rebuilt for the ESP32-S3.
The production firmware was rebuilt from the ground up for the ESP32-S3: the LED matrix rendering, the Wi-Fi handling, and the on-device settings dashboard all run natively — fast boot, low power, and no SD card to corrupt.
Over the air
It only gets better.
New scenes, fixes, and features arrive over the air. The device checks in, verifies the update, and installs it over Wi-Fi — so the box you buy today keeps improving without any action from you.
The mechanics
From broadcast to pixel.
- Aircraft broadcast ADS-B. Planes continuously transmit position, altitude, and speed in the clear. That open data is the raw material for everything Mach 2 shows.
- The cloud builds your update. Our backend filters the live feed to your saved area and mode, then publishes a compact, ready-to-draw payload.
- MQTT delivers it. The device holds one authenticated MQTT session and receives only the topics it subscribed to — your data, your settings, your updates.
- The ESP32-S3 renders locally. The box composes the scene and drives the 2,048-pixel matrix itself. Pull its plug and nothing of yours lives anywhere it shouldn't.
MQTT over TLS
Persistent outbound session
Mach 2 subscribes to its own private channel. The cloud publishes compact JSON updates; the display renders locally.
Over-the-air
One update, the whole fleet.
Because every Mach 2 checks in with the same broker, a single signed firmware build can roll out to the entire fleet. Each box verifies the update, installs it over Wi-Fi, and reboots into the new version on its own.
Signed buildOTA ready
Release console
Signed OTA
Published once. Delivered as each display checks in.
Prototype to production
A long way from the first one.
The very first prototype ran on a Raspberry Pi — slow to boot, fussy to set up, and held together by enthusiasm. Today's Mach 2 is a different machine: a purpose-built ESP32-S3 board in a solid maple enclosure, individually assembled, bench-tested, and burned in before it ships. Every unit is checked by hand, and the firmware keeps maturing through OTA. What started as a hobby has become a product I stand behind.
Open source & GPL compliance
Legacy source, clearly separated.
FlightTrackerLED's legacy Raspberry Pi prototype was based on Colin Waddell's open-source its-a-plane-python, also published as RGB Matrix Flight Tracker and released under the GNU General Public License v3.0. Because that base project is GPLv3, the modified legacy Raspberry Pi source, license, and notices are published at FlightTrackerLED/FlightTracker-Legacy to keep the legacy work fully compliant, despite claims to the contrary.
Mach 2 is not that legacy Raspberry Pi build. It is a proprietary, completely separate ESP32-S3 product with independently written firmware for the current hardware, renderer, MQTT workflow, browser setup, and OTA update system.
Legacy source: FlightTrackerLED/FlightTracker-Legacy · Original project: ColinWaddell/its-a-plane-python · Licensed GNU GPL v3.0
Community
The Hangar
A small forum for Mach 2 owners, plane spotters, and anyone curious about the box. Browse freely. Sign in to post, react, and unlock the members area.
248members
62threads
413replies
Browsing as guest
Sign in
Welcome back
No password — this is a local demo. Pick a handle and you're in.
New thread
Start a conversation
Be specific. Include firmware version + what you've tried if asking for help.